
This sender failed our fraud detection checks fix | GoDaddy | Contact Form 7| Office 365 | updated 2017
![]()
So once again we started seeing this error in our 365 email system. It is a specific problem we are seeing come across from some of our GoDaddy customers who also were using Office 365 Exchange for Email and using the contact form 7. Some of our contact form submissions from the websites were being marked as spoofing from Office 365.
This is an update to our older popular post that seemed to solve it before, but obviously something changed at Office 365!
Our Products involved included:
- Godaddy Shared Hosting (WordPress)
- Contact Form 7 Plugin
- Office 365 Business Premium
After countless hours on the phone with Godaddy and changing TXT records to include SPF for Godaddy’s servers, translating email headers, adding whitelisted email server IP’s………..we came upon the real easy solution to solve this.
The Solution for Fraud Detection Checks in Office 365 and Contact Form 7 with GoDaddy Hosting
Here are the steps to solve this new issue:
- Find the hostname of the cpanel or the server that is responsible for sending the email. Usually it is something like 6689575243.prod.iad2.secureserver.net.
Couple ways to do this.
Use an Email Header Analyzer to find the hostname of the website.
or Use phpinfo.php to find the hostname.
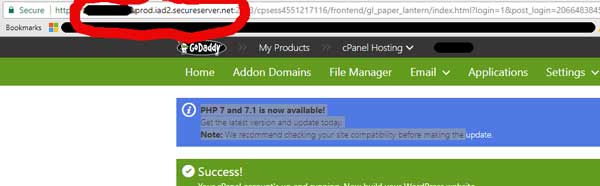
or THE BEST AND EASIEST WAY is to log into GoDaddy and grab it from the URL of your cpanel (Or use the hostname of your VPS server if you do not have shared hosting)
- Then change the From email address to the new hostname address (Making it a valid email by prepending wordpress@, e.g., wordpress@6689575243.prod.iad2.secureserver.net)
- Ignore the configuration errors that contact form 7 gives you.
- Test the contact form to verify the fix
ANALYZE THE EMAIL HEADER TO FIND HOSTNAME
First we need to find the header so we open up an email that came from the website with the fraud alert, and look at the properties to see the email header data. Copy the whole code of the email header and save it to notepad or your clipboard. Next we need to analyze it so we navigate to our favorite email header tool at MX Toolbox: https://mxtoolbox.com/EmailHeaders.aspx
Paste the code and you can find the hostname usually in the first box:

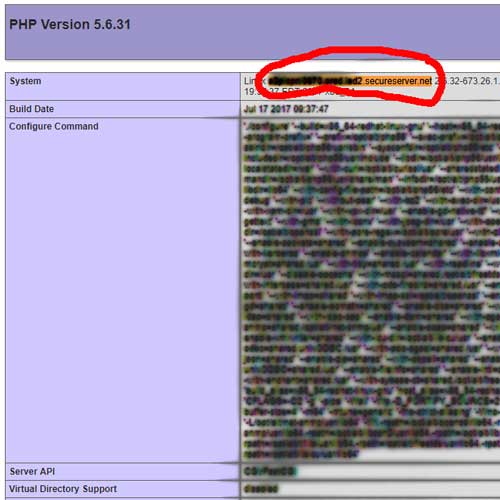
OR USE PHPINFO.PHP FILE TO FIND HOSTNAME
Use FTP access to create or to upload a phpinfo.php file in the root of the website director (usually public_html). Add the following code to the phpinfo.php file and save:
<?php
// Show all information, defaults to INFO_ALL
phpinfo();
?>
A more descriptive post can be found here to create a phpinfo.php file: https://mediatemple.net/community/products/dv/204643880/how-can-i-create-a-phpinfo.php-page
The hostname usually is in the first line of the system
OR LOG INTO YOUR CPANEL OR SERVER
Pretty simple stuff here, login to your account and look at the url.
IMPLEMENT IN CONTACT FORM 7
Now we take the hostname and add a prefix such as wordpress@ and put it into the From field. Ignore the configuration error(s) detected in Contact Form 7.

Make sure you test, test, test the form. For redundancy it is best to install a database plugin to capture all form submissions. We use https://wordpress.org/plugins/contact-form-cfdb7/
Hope this helps those who are pulling their hair out and Googling to the end of the internet.
If you found this helpful give us a like on facebook: https://www.facebook.com/liontreegroup/, our graphic designers sometimes post really funny stuff!!


